Introduction
Nowadays, most people working in the software industry look for the resources they need to improve the quality of their code and build quality tools, whether for personal, business, or altruistic purposes.
When we search for references on how to build better software, the first thing we usually find is the SOLID principles, defined by Robert C. Martin (Uncle Bob) at the beginning of the 2000s. SOLID is the acronym for five basic principles in object-oriented programming (OOP) that help us make the code we write more maintainable.
It is not the goal of this article to explain each and every one of those principles. Instead, we will focus on the last one, represented by the letter D (Dependency Inversion Principle).
Dependency Inversion Principle
The Dependency Inversion Principle states that high-level modules should not depend on low-level modules. Both should depend on interfaces and therefore work with abstractions. This allows us to reduce coupling between the different layers of the software.
To make sense of this fairly abstract principle, we must start from the idea that the application or tool we want to build is divided into layers. Otherwise, trying to apply it would lead us into poor design patterns.
On the other hand, using interfaces is strongly tied to the programming language we choose. For example, JavaScript does not have interfaces, but this principle can still be applied. Remember: “A class that does not explicitly implement an interface implements itself.”
What does it allow us to do?
Once we understand the principle, it is time to explain what we gain by working with abstractions instead of real modules.
When we work with interfaces, we stop worrying about the implementation details underneath. We only need to know that the object or class we want to consume exposes methods with a specific signature that will always be available when we use it.
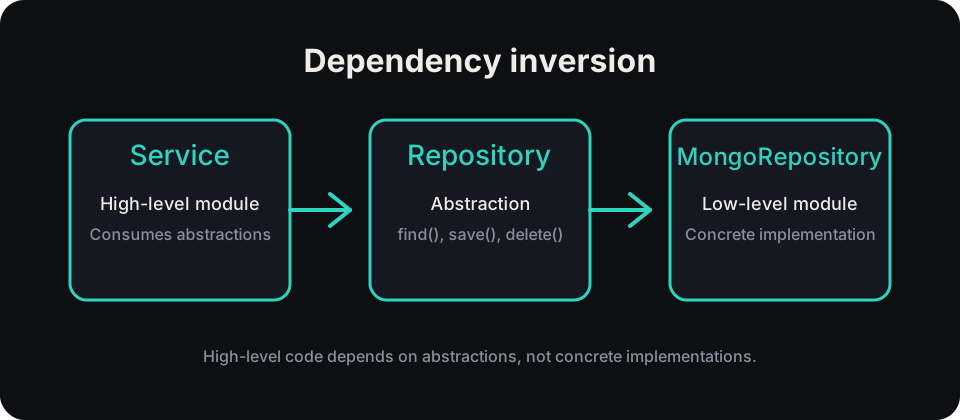
These modules can then be replaced whenever we define which implementation we want to use.
Suppose we want to apply the repository pattern. We can have different implementations, such as one for PostgreSQL and another for MongoDB, both of which can be used interchangeably without modifying the code that consumes them.
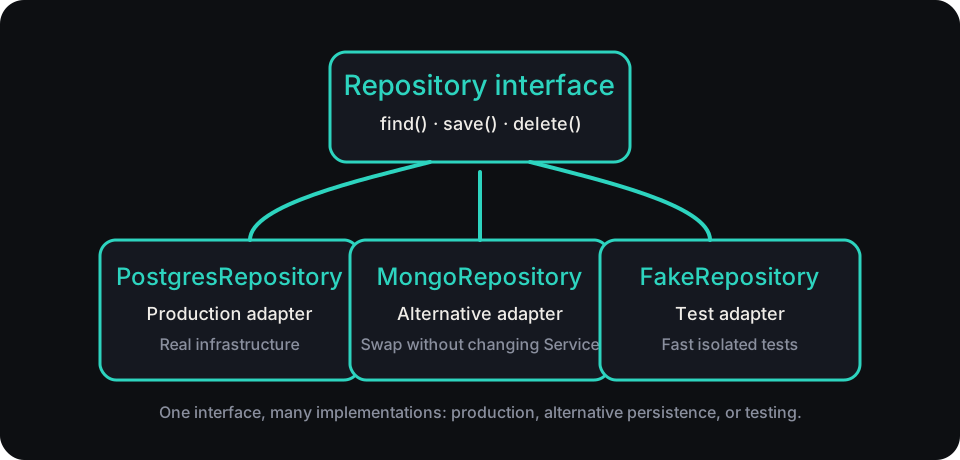
Even in early development stages, where implementation details are not yet relevant and decisions can be postponed, we can work with interfaces and use a test-only implementation.
How do we do it?
In general, this process of assigning the module we are interested in to a class is done through constructors. Since tsyringe is a library for TypeScript, the following code shows how we could do it without this library:
class Service {
  constructor(private repository: Repository = new MongoRepository()) {}

 	find () {
    return this.repository.find()
  }
}
With this example we can see that when building our service, we may optionally pass a repository. If we do not, it will use the default value MongoRepository.
In tests we could have code like this to inject a test repository:
it('calls to find', () => {
  const repository: Repository = { find: jest.fn() }
  const service = new Service(repository)

 	service.find()

 	expect(repository.find).toHaveBeenCalled()
})
However, if we wanted to do the same thing from a higher-level layer than the service, for example the controller, we would need to reflect the whole constructor call chain there in order to inject the desired repository. That does not reduce coupling at all and makes the code more fragile.
const repository: Repository = { find: jest.fn() }
const controller = new Controller(new Service(repository))
tsyringe, on the other hand, lets us simplify this whole process and reduce coupling between modules by using annotations.
What is tsyringe?
Now that we understand the Dependency Inversion principle and have seen how to apply it in TypeScript, we can understand what the library gives us compared to the classic approach.
The tsyringe library, developed by Microsoft, is designed, like TypeScript, to be used in OOP paradigms. With it we can annotate the classes we want to inject and define the lifetime that will be used when resolving the dependency.
@injectable()
class MyDependency {}
We can also define in the constructor of the class receiving the dependency how that dependency should be resolved:
class MyService {
  constructor(@inject(MyDependency) private dependency: MyDependency) {}
}
Of course, we can work with interfaces just as the principle suggests:
interface Dependency { foo: () => void }

@injectable()
class MyDependency implements Dependency { /* ... */ }

@injectable()
class MyService {
  constructor(@inject("Dependency") private dependency: Dependency) {}
}

container.registerInstance("Dependency", new MyDependency());
const service = container.resolve(MyService)
This lets us prototype our software quickly, while also unit testing elements that depend on system modules by faking calls to methods on those injected modules.
With one caveat: if we use interfaces, they cannot be instantiated automatically, so we must register the implementation manually.
How do we install it?
In its current version, JavaScript has no support for annotations, although future versions are expected to include it.
Remember that when we transpile TypeScript code to JavaScript, all entities that are not native to the language and cannot be encapsulated inside functions disappear.
That is why, to support this functionality, we need to install not only tsyringe but also the reflect-metadata library.
npm i tsyringe reflect-metadata
Once that is done, we need to do two things:
- Enable annotations in TypeScript
- Import
reflect-metadatastatically in the application entry point and in the tests.
To enable annotations in the configuration, we only need to add the following lines to our tsconfig.json file:
"compilerOptions": {
//...
  "experimentalDecorators": true,        /* Enables experimental support for ES7 decorators. */
  "emitDecoratorMetadata": true,         /* Enables experimental support for emitting type metadata for decorators. */
//...
}
Next, we need to import the reflect-metadata library in the entry point of our application so that it is loaded before annotations are used.
This could be done elsewhere in the application, but I find this point more intuitive because it enables usage anywhere. If that is not your case and you want to limit the use of annotations, then you should evaluate your case more specifically.
 //server.ts
import 'reflect-metadata'
// ...

runServer()
In the same way, our tests, except e2e tests, will rarely go through this initialization file. Even for e2e tests, you will probably want to use annotations before startup, so you should add this import in that scope as well.
You can do this individually in each test, or globally in a configuration file such as Jest’s setupTests.ts.
Injectable, Singleton and Inject
As mentioned earlier, tsyringe works by using a global instance called container, where it registers our classes as they are referenced in code, either injected into other components or registered in the container itself.
This way, when a dependency is requested, the library can resolve it based on how it was previously annotated.
To register a class, the two most commonly used annotations are injectable and singleton. While the first registers a new instance in the container each time it is requested, the second creates only one entity, just like the singleton design pattern.
@injectable()
class PostgresRepository implements Repository() {
  constructor() {}

  find () { /* ... */ }
}
Once the class is annotated, we can use it by injecting it into the constructor of the class that will use it:
@injectable()
class Service {
  constructor(@inject('Repository') private repository: Repository) {}
}
At the moment Service is constructed, an instance will be created inside container, and we will be able to access it from anywhere in our application. Since it is an injectable, multiple instances of the same annotation may exist.
However, because the constructor of Service references an interface, we must explicitly tell the container how to resolve it, as shown next.
Resolve and Register
When we use the class itself with the inject annotation, the library knows which value to define in the container instance. When we use an interface, which we associate with a string, it must be registered manually before calling the container:
container.registerInstance("Repository", new PostgresRepository());
Just as injected module instances are registered in container, we can retrieve the desired instance through it using the resolve method:
import { container } from 'tsyringe'

const service = container.resolve('Service')
This can be useful when overriding methods in our tests:
import { container } from 'tsyringe'

const repository = container.resolve('Repository')
repository.find = jest.fn(() => 'irrelevant')
Another option is to register our own instances before starting the application. For example, to define globally which repository implementation should be used:
import { container } from 'tsyringe'

const runServer = () => {
  container.registerInstance('Repository', new PostgresRepository())
}
const repository = container.resolve('Repository')
repository.find = jest.fn(() => 'irrelevant')
Conclusion
Thanks to tools like this, we can make the code of our applications much more maintainable, dissect the different layers of the application in a much more elegant way, and create tests that are even more dynamic and easier to maintain.
As a downside, it is true that we become coupled to the technology, but that is a trade-off worth evaluating and, in my opinion, a fairly reasonable one, especially considering who developed both the tool and the language.
I hope this post has been helpful, either by explaining the concept of dependency inversion or by introducing the tool itself. If so, feel free to share it.
As always, here is a link to the Github repository, where you can explore the examples shown here in more depth.